
SchemaChange deploying to Github
SchemaChange is a lightweight, open-source Python library designed to manage database changes in Snowflake. It tracks metadata changes in a history table and is commonly used in DevOps pipelines.
This post looks at how to configure SchemaChange on GitHub to deploy script changes to your Snowflake instance, i.e., CI/CD. Typical GitHub setups use two branches or environments, with the lower one used to check that the script changes have had the desired result before being applied to the Production environment. To keep this relatively short, I have set it up for one environment or branch, Main. The code is there to extend it to another stage.
The user is authenticated on Snowflake using password-protected private and public keys. There were not many examples available online demonstrating this approach, and it has proven to be a pain to set up, so I have included my troubleshooting steps that may be helpful if you are experiencing problems. You can go big and go straight to Deploy on GitHub Actions and come back to the troubleshooting steps if you have problems.
1.0 Local Code Environment
I am using a Docker container for development for the troubleshooting steps.
Install
- Download the repository https://github.com/chrisZingel/schemachange_setup_2025
- Install Visual Studio Code and add the extension for
Dev Containers - Install Docker Desktop
The file devcontainer.json configures the development container to use your Docker image, specified in the Dockerfile, as its base. When opening the folder containing the downloaded GitHub project in Visual Studio Code, select the option to Reopen in Container (see for more details on Docker setup)
The devcontainer.json file links your folder ~/.ssh to the container’s /home/runner/.ssh. This is to match the location where the SSH key is stored when running GitHub Actions.
1.1 Create an RSA key for Authentication
In the terminal of Visual Studio Code, that is, inside the Docker container, you will need to run the following code to generate the SSH key. The key is also kept in your local ~/.ssh folder.
cd /home/runner/.ssh
openssl genrsa 2048 | openssl pkcs8 -topk8 -inform PEM -out snowflake_rsa_key.p8
Enter your passphrase for the private key. I have used ‘12345’, but ideally, it should be a bit more complicated in practice.
The commands generate the following encrypted private key in PEM format.
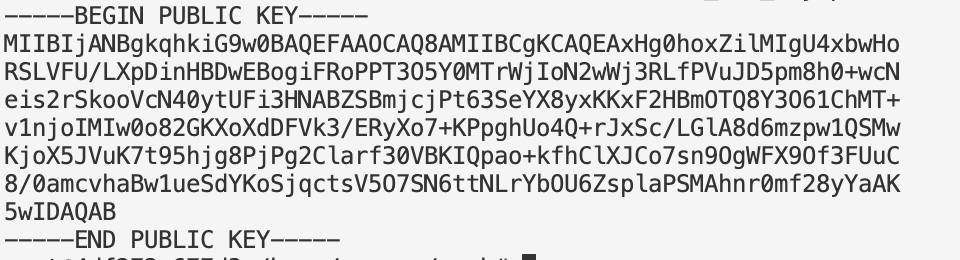
To generate the public key
openssl rsa -in snowflake_rsa_key.p8 -pubout -out snowflake_rsa_key.pub
1.2 Snowflake
In my case, I have created a free Snowflake account that I can safely discard once finished. You will need to grab the account identifier.
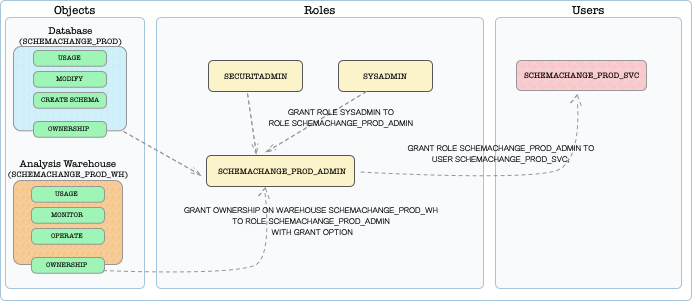
Setup up Snowflake Role/User and History table
Run the following script to create the user that SchemaChange uses to interact with Snowflake, along with the database used to keep track of files previously run. I have created a super role, but in practice, you would want to restrict the role’s access to only those databases where you expect changes. It is considered good practice to assign the minimum permissions needed, as this reduces the blast radius if something goes wrong.
The public key is used for authentication. It is more secure than just using a password, but in practice, you would also want to add a network policy to restrict access to this user from GitHub IP addresses.
The following code needs to be run in the Snowflake web console. I am only doing this for PROD, but if you were adding another stage, you would need to run it again after changing the STAGE variable.
USE ROLE USERADMIN;
SET STAGE='PROD'; --<<<<< This need to be changed to PROD and run again

SET TARGET_DB_NAME = 'SCHEMACHANGE_' || $STAGE;
SET ADMIN_ROLE = $TARGET_DB_NAME || '_ADMIN';
SET WAREHOUSE_NAME = $TARGET_DB_NAME || '_WH';
SET SERVICE_USER = 'SCHEMACHANGE' ||'_' || $STAGE || '_SVC';

CREATE USER IF NOT EXISTS IDENTIFIER($SERVICE_USER)
    TYPE = SERVICE
    COMMENT = "Service user for SCHEMACHANGE Snowflake"
    RSA_PUBLIC_KEY = 'MIIBIjANBgkqhkiG9w0BAQEFAAOCAQ8AMIIBCgKCAQEAxHg0hoxZilMIgU4xbwHo
RSLVFU/LXpDinHBDwEBogiFRoPPT3O5Y0MTrWjIoN2wWj3RLfPVuJD5pm8h0+wcN
eis2rSkooVcN40ytUFi3HNABZSBmjcjPt63SeYX8yxKKxF2HBmOTQ8Y3O61ChMT+
v1njoIMIw0o82GKXoXdDFVk3/ERyXo7+KPpghUo4Q+rJxSc/LGlA8d6mzpw1QSMw
KjoX5JVuK7t95hjg8PjPg2Clarf30VBKIQpao+kfhClXJCo7sn9OgWFX9Of3FUuC
8/0amcvhaBw1ueSdYKoSjqctsV5O7SN6ttNLrYbOU6ZsplaPSMAhnr0mf28yYaAK
5wIDAQAB';
USE ROLE SECURITYADMIN;
CREATE ROLE IF NOT EXISTS IDENTIFIER($ADMIN_ROLE);
GRANT ROLE SYSADMIN TO ROLE IDENTIFIER($ADMIN_ROLE);
GRANT ROLE SECURITYADMIN TO ROLE IDENTIFIER($ADMIN_ROLE);

USE ROLE SYSADMIN;
CREATE DATABASE IF NOT EXISTS IDENTIFIER($TARGET_DB_NAME);
CREATE WAREHOUSE IF NOT EXISTS IDENTIFIER($WAREHOUSE_NAME);


USE ROLE SECURITYADMIN;
GRANT OWNERSHIP ON DATABASE IDENTIFIER($TARGET_DB_NAME) TO ROLE IDENTIFIER($ADMIN_ROLE) WITH GRANT OPTION;
GRANT OWNERSHIP ON WAREHOUSE IDENTIFIER($WAREHOUSE_NAME) TO ROLE IDENTIFIER($ADMIN_ROLE) WITH GRANT OPTION;

GRANT ROLE IDENTIFIER($ADMIN_ROLE) TO USER IDENTIFIER($SERVICE_USER);
-- Assign role to ACCTADMIN since this role has both SECURITYADMIN and SYSADMIN permissions
GRANT ROLE IDENTIFIER($ADMIN_ROLE) TO ROLE ACCOUNTADMIN;
A generic representation of the above tables and roles
1.3 Troubleshoot (Checking Credentials)
In the Visual Studio Code terminal, you can test that you have the credentials set up correctly (i.e., private and public keys, and that the user has been properly set up on Snowflake) by running a Python script using the Snowflake connector to connect to Snowflake.
To test that the configurations are correct, run the following Python code.
import os
import snowflake.connector as sc

private_key_file = '/home/runner/.ssh/snowflake_rsa_key.p8'; # Full path required

conn_params = {
    'account': 'YAWLFGR-LD61536',
    'user': 'SCHEMACHANGE_PROD_SVC',
    'authenticator': 'SNOWFLAKE_JWT',
    'private_key_file': private_key_file,
    'warehouse': 'SCHEMACHANGE_PROD_WH',
    'private_key_file_pwd':'12345'
}

ctx = sc.connect(**conn_params)
cs = ctx.cursor()
cs.execute("SELECT 'does this work!'").fetchall()
If you have the correct setup, you will get the following output.
[('does this work!',)]

1.4 Troubleshoot (Running SchemaChange Locally)
The following steps allow you to run SchemaChange locally within Visual Studio Code. It is often easier to get something running locally before attempting to run it in GitHub Actions.
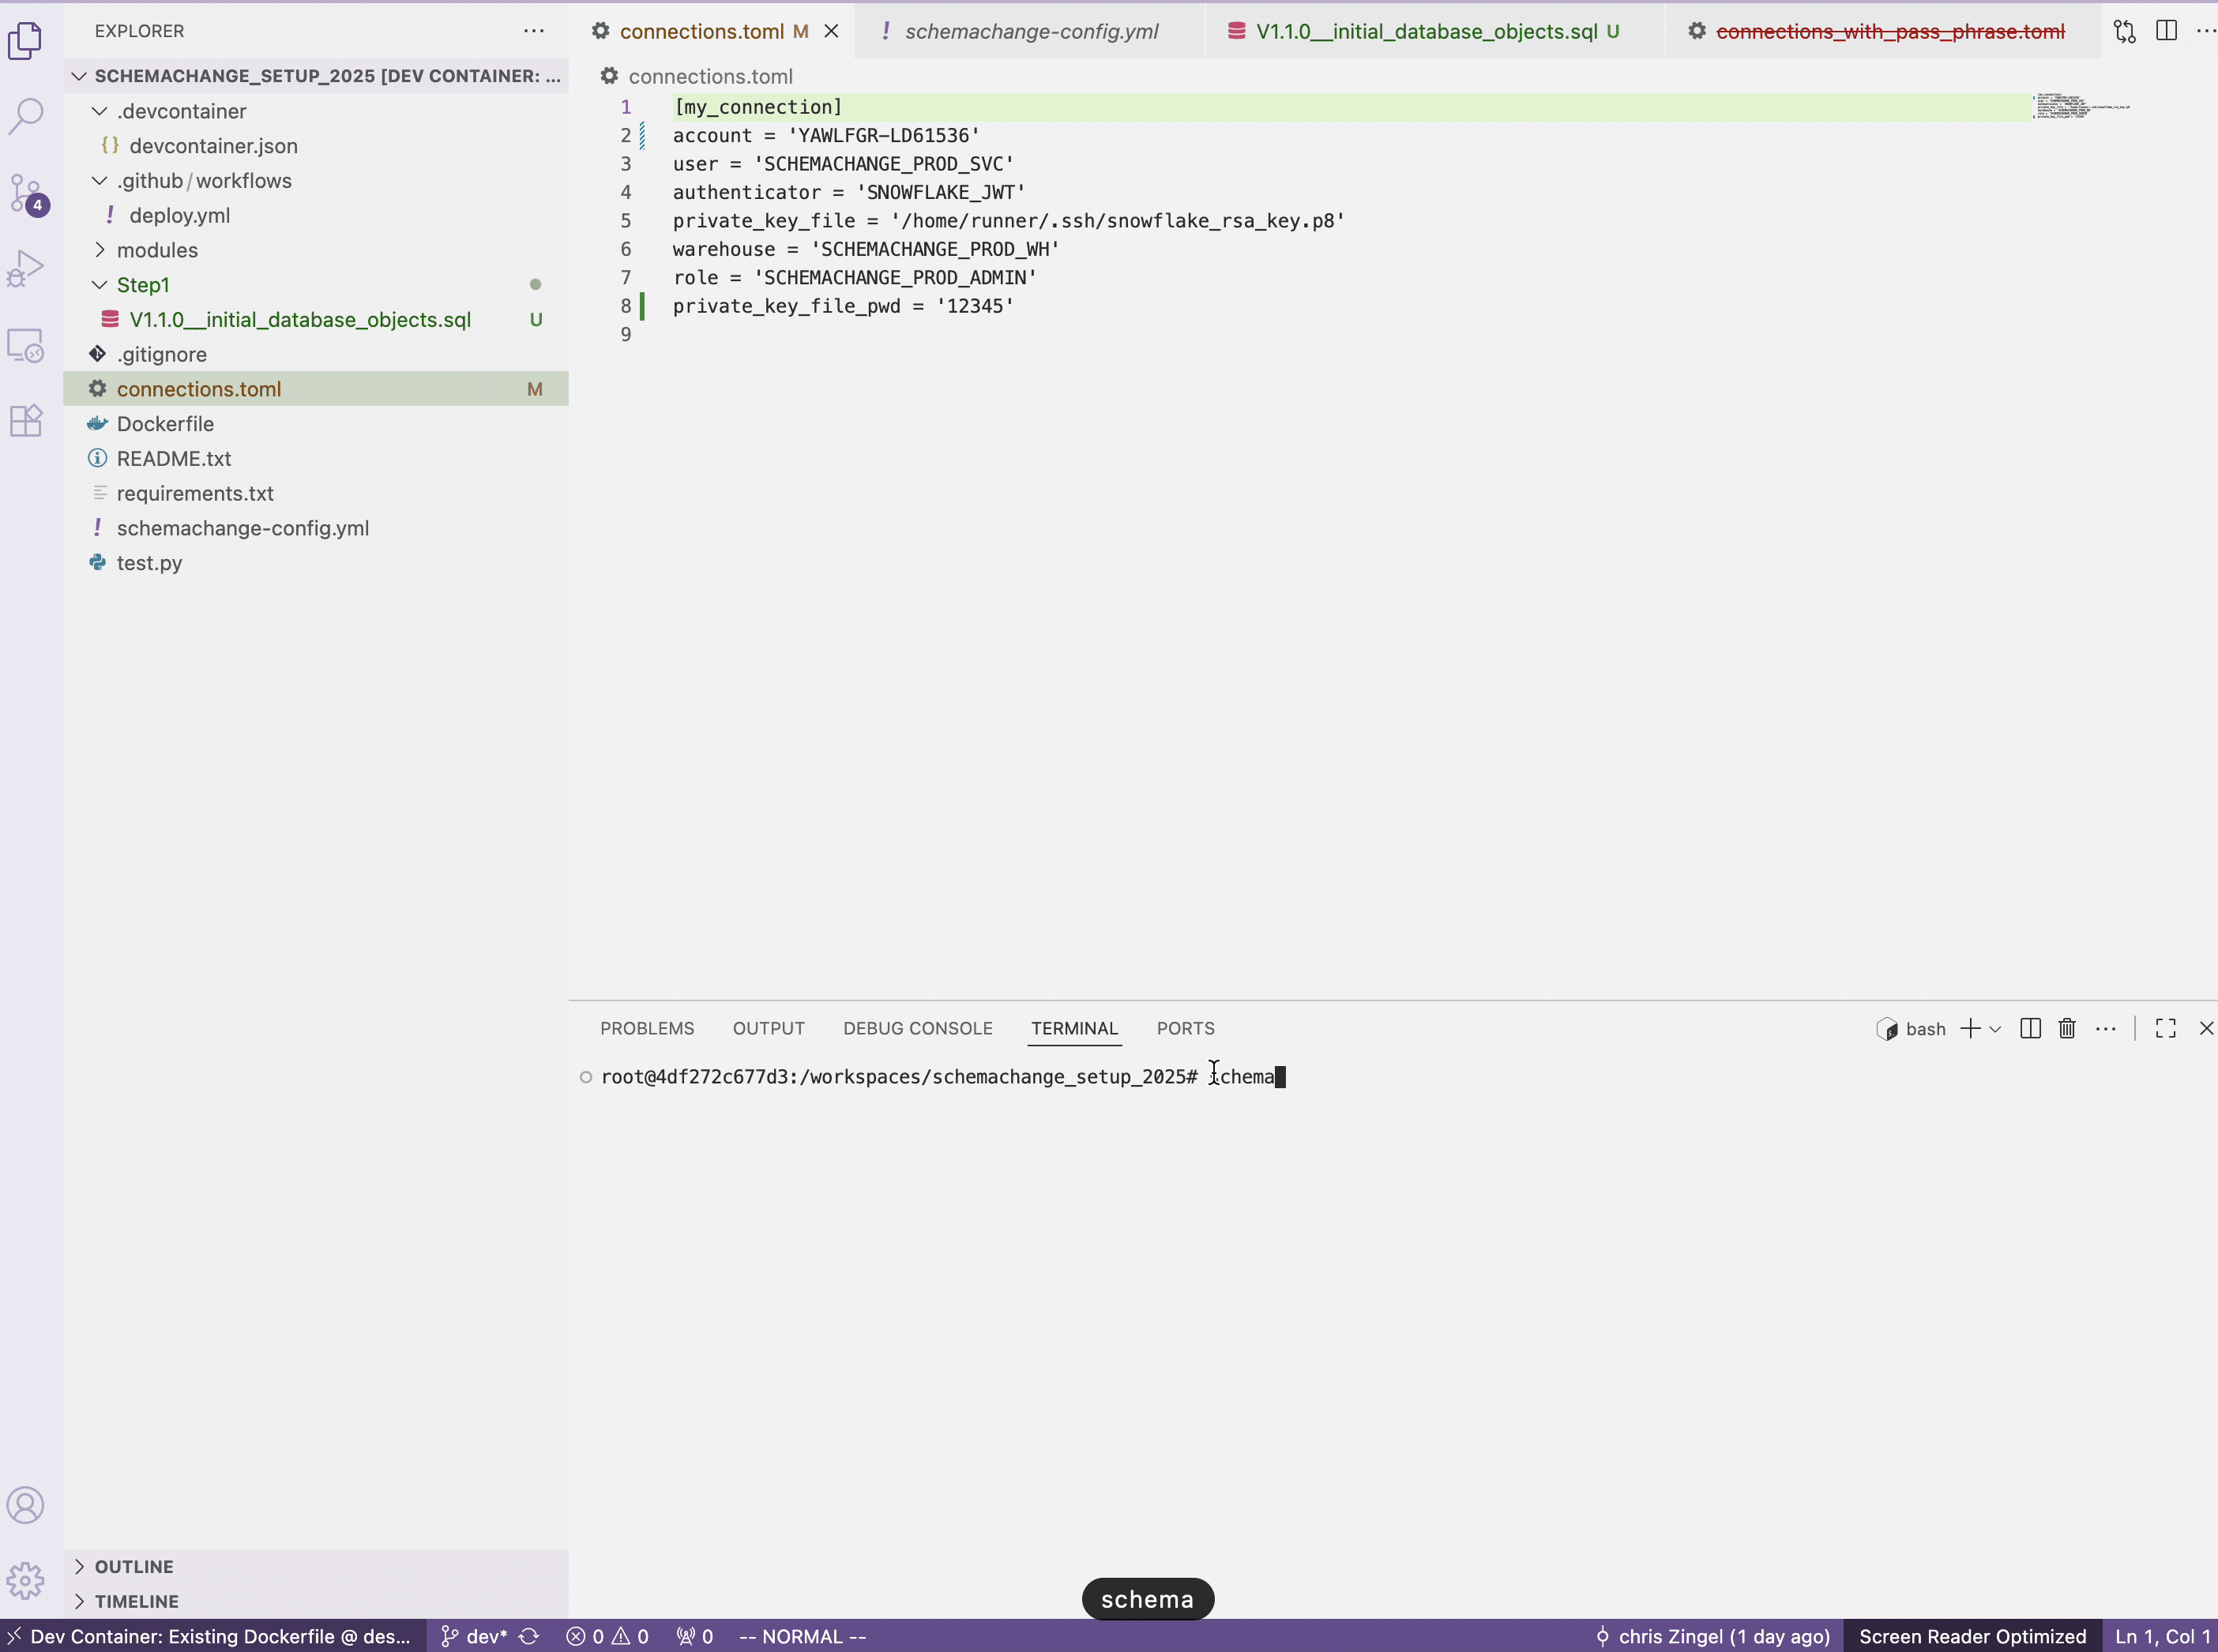
There are two files you need to take note of: the connections.toml, which contains the configurations to connect to Snowflake, and schemachange-config.yml, which contains parameters applicable to the project as a whole, such as whether you are using a default database and which toml file to use.
Steps
- You will need to manually append the code snippet below to the
connections.tomlfile. This appending of the passphrase happens in GitHub Actions since we do not want the passphrase to be included in the GitHub repository where anyone with read access could see it.private_key_file_pwd = '12345' - In the terminal run the following
schemachange deploy
All going good you will get the following:
2.0 GitHub Actions Example
Let’s bring it all together and have GitHub Actions deploy our code using GitHub Actions. When the branch Main is updated, this will automatically trigger the action to run. Who can merge to Main and whether code reviews are required before that occurs can all be set up in GitHub.
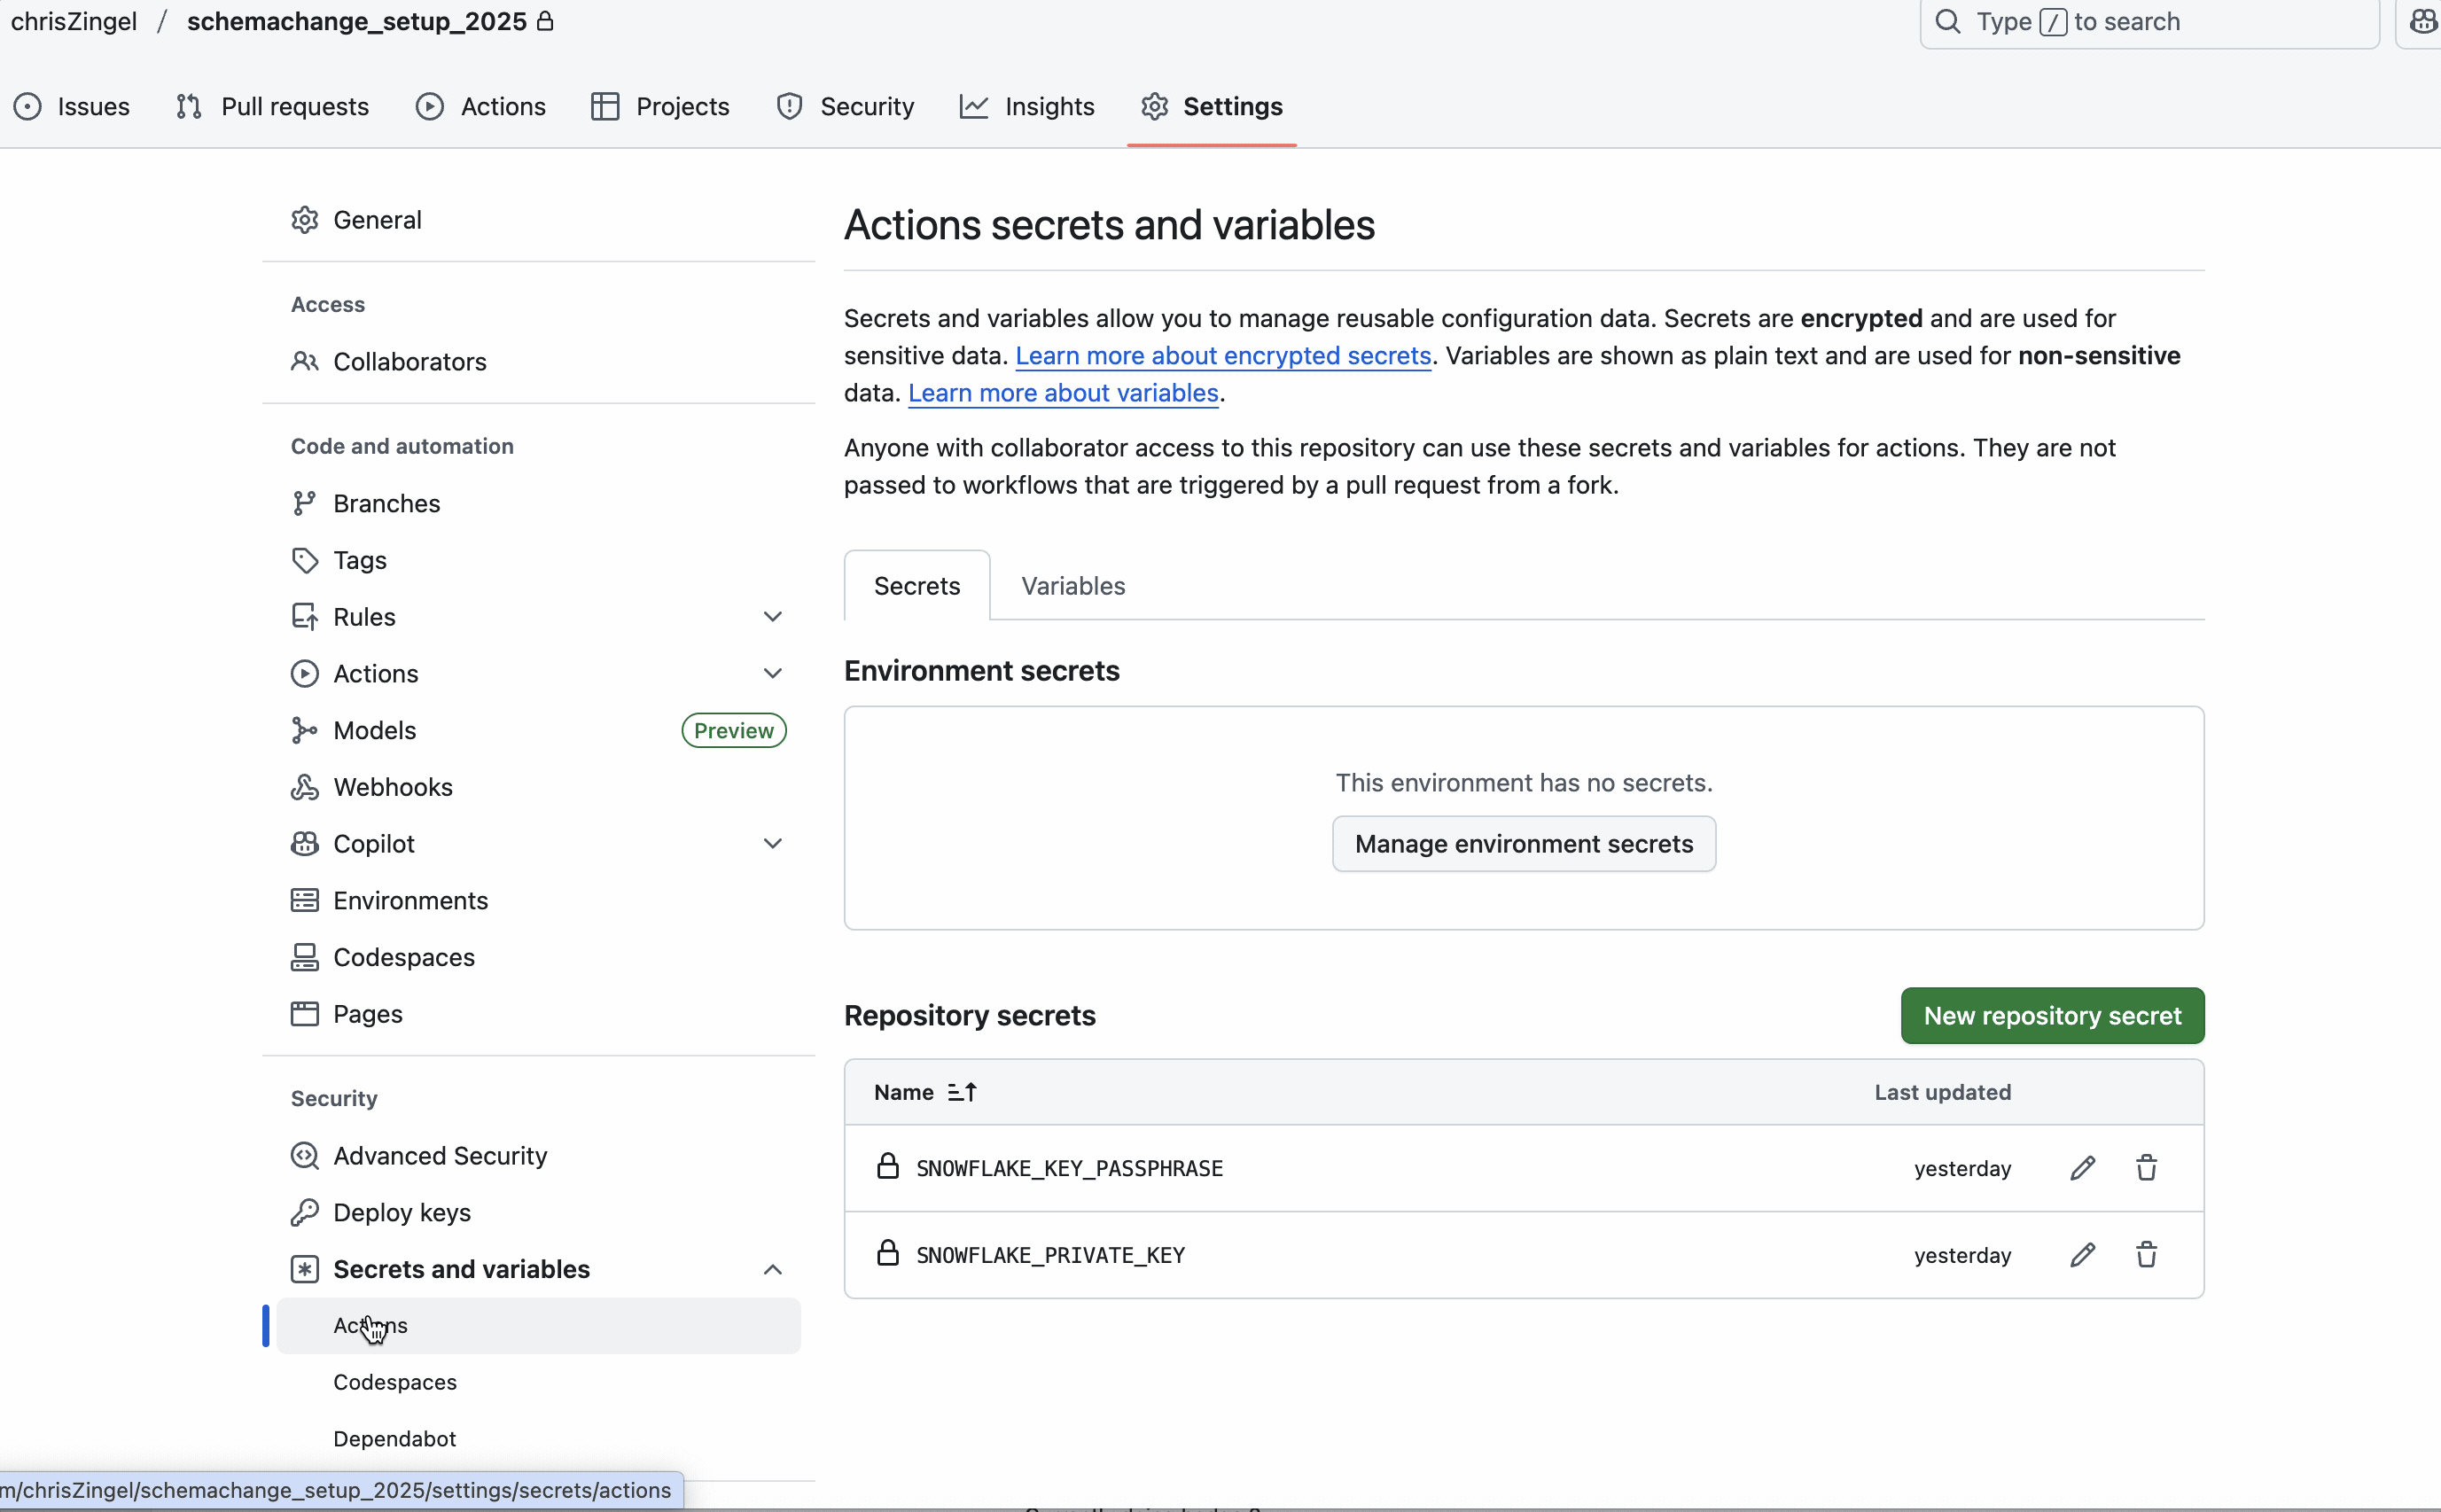
As previously mentioned, the private key and passphrase are not included in the code; instead, we use GitHub Secrets. You will need to create two secrets called SNOWFLAKE_KEY_PASSPHRASE and SNOWFLAKE_PRIVATE_KEY.
The deploy.yml has the script that runs via Github Actions
Setting up Github Action ( deploy.yml)
name: Deploy Snowflake Objects

on:
  # Trigger on push for the dev branch
  push:
    branches:
      - main

jobs:
  deploy:
    runs-on: ubuntu-latest
    steps:
      - name: checkout repo
        uses: actions/checkout@v4

      - name: Setup Python 3.10
        uses: actions/setup-python@v5
        with:
          python-version: '3.10'

#installing required library on container

      - name: instaling snowflake
        run: pip install snowflake

      - name: instaling snowflake-connector-python
        run: pip install snowflake-connector-python

      - name: instaling schemachange
        run: pip install schemachange

# creating a dynamic files in from the private key stored in git secret and providing access only
 # to owner so chmod 600
      - name: Create private key file
        run: |
          mkdir -p /home/runner/.ssh
          echo "$"  > /home/runner/.ssh/snowflake_rsa_key.p8
          chmod 600 /home/runner/.ssh/snowflake_rsa_key.p8
          echo "private_key_file_pwd = $"  >> ./connections.toml
          chmod 600 ./connections.toml
 #setting environment variable by using all the secrets

      - name: Deploy schemachange
        run: |
          schemachange deploy

# Remove the private key file after use
      - name: Clean up files
        run: rm -f /home/runner/.ssh/snowflake_rsa_key.p8
The following part does the following:
- Creates a directory for the
.sshfolder - Creates the private SSH key from the GitHub secret
- Appends the passphrase to the
tomlfile - Restricts access to the private key and
tomlfile so only the owner can read it
     mkdir -p /home/runner/.ssh
          echo "$"  > /home/runner/.ssh/snowflake_rsa_key.p8
          chmod 600 /home/runner/.ssh/snowflake_rsa_key.p8
          echo "private_key_file_pwd = $"  >> ./connections.toml
          chmod 600 ./connections.toml
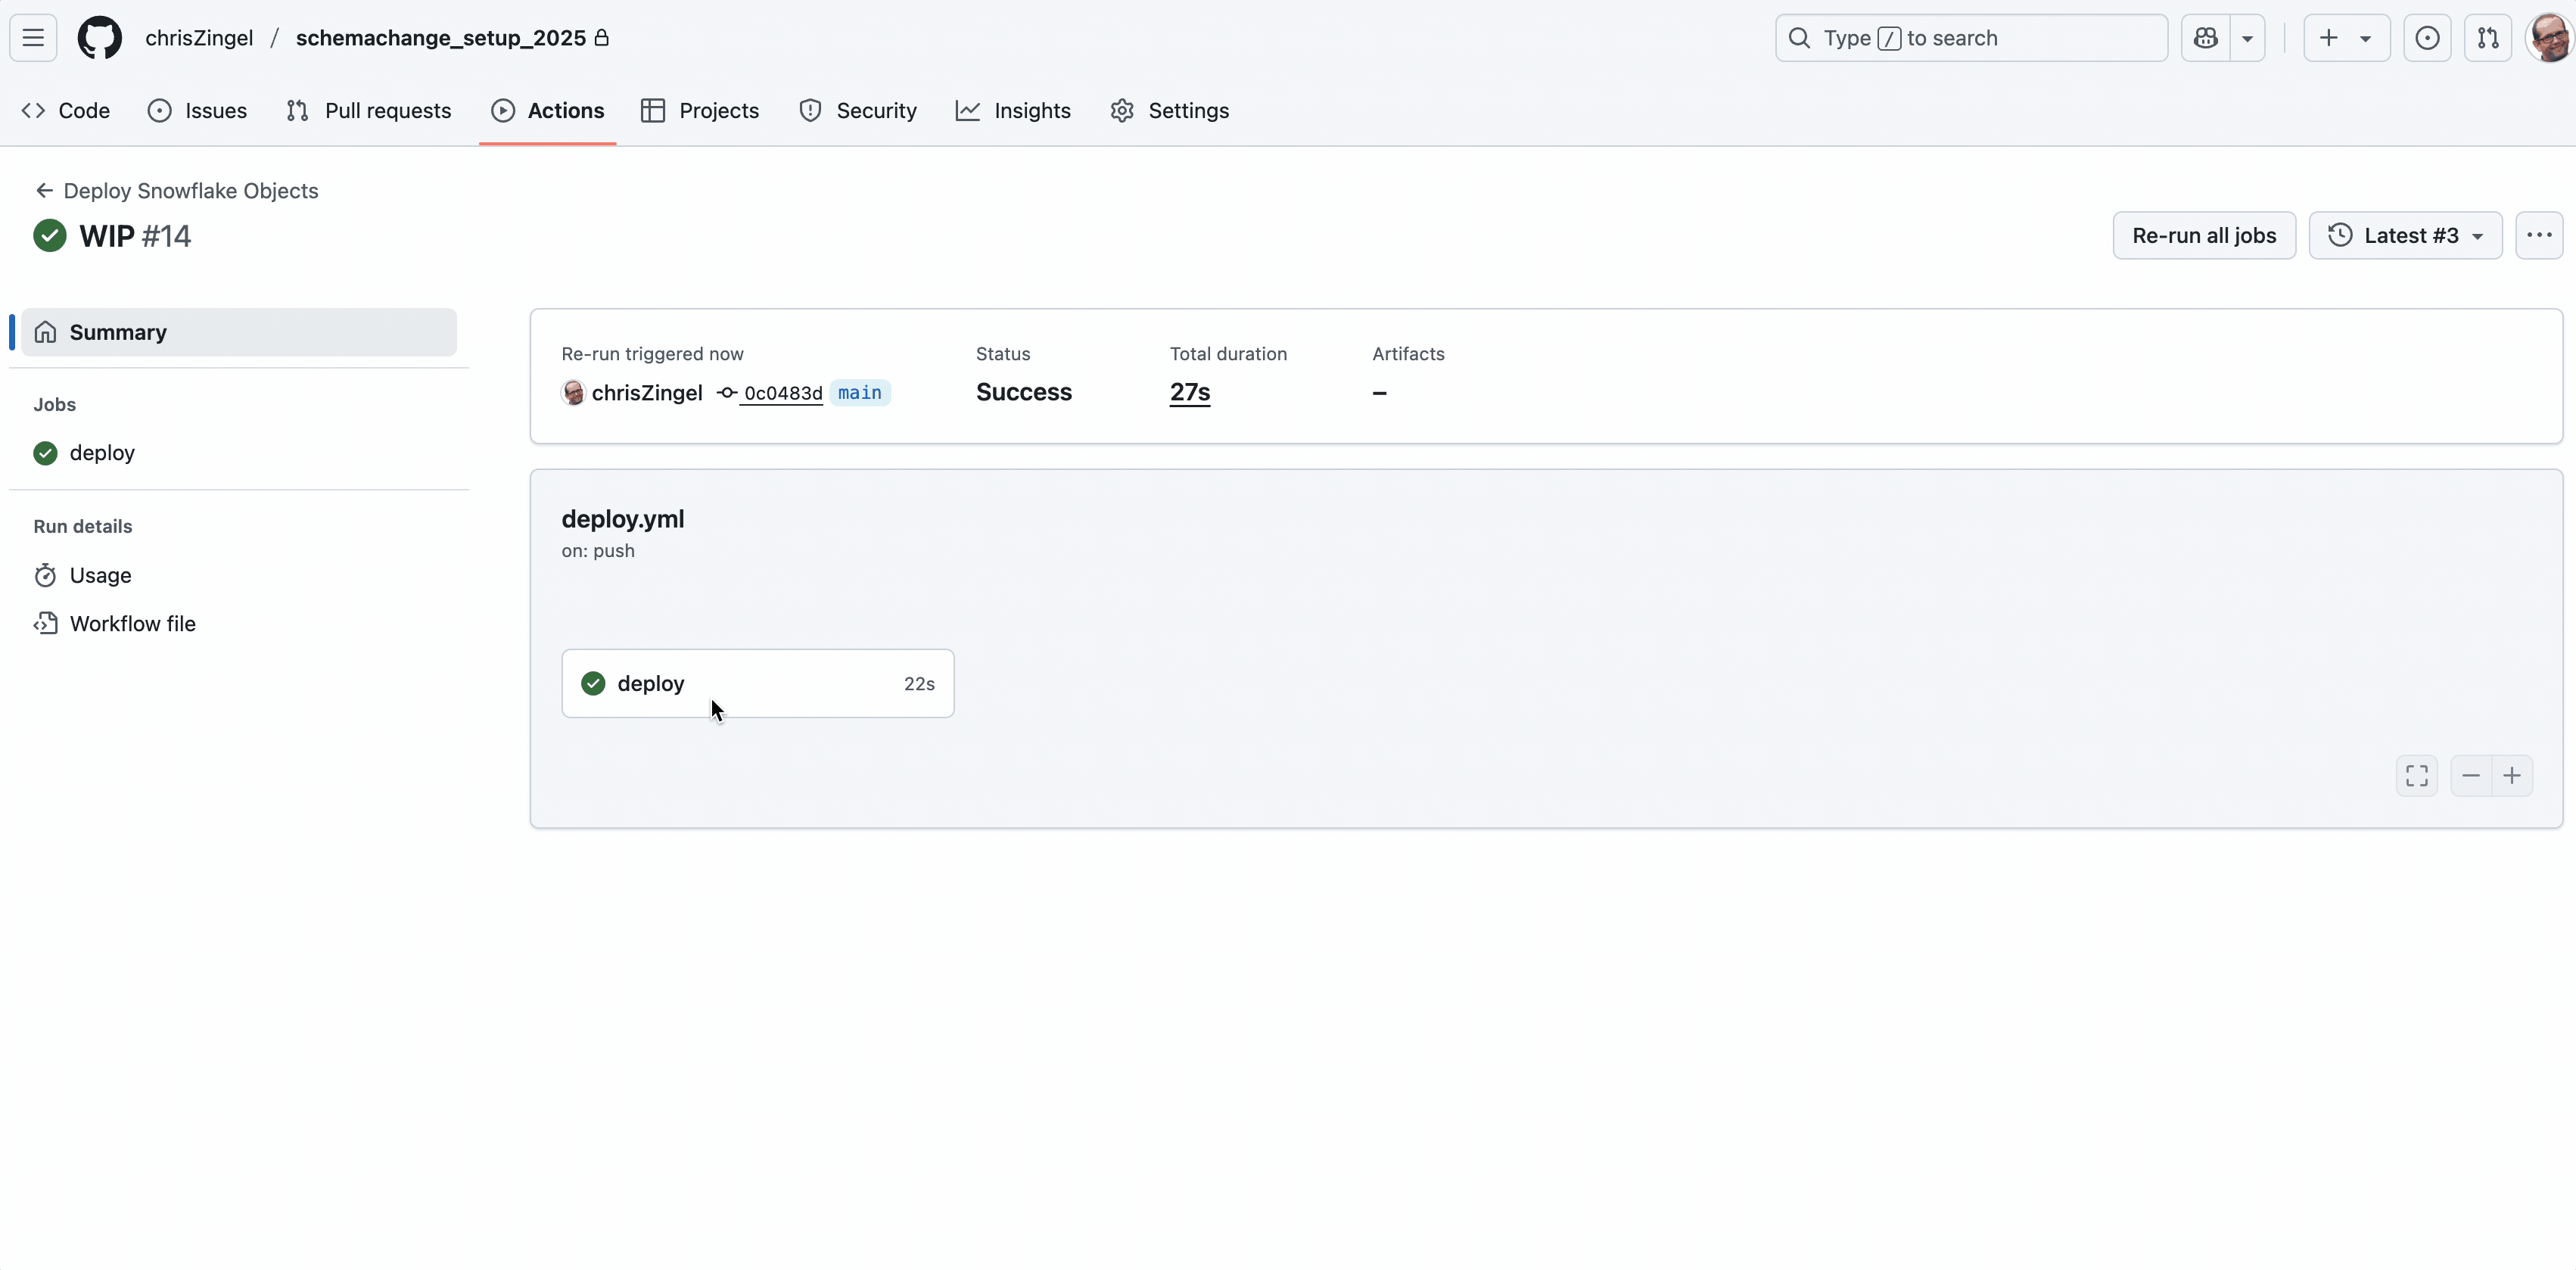
That’s it. When you next deploy to Main, the actions should automatically run with a successful result as shown below.
Appendix
How to use SchemaChange
In terms of using SchemaChange, check this guide from Snowflake and the SchemaChange GitHub repository.
There are just three types of SchemaChange scripts, with nested folder structures being ignored:
- Versioned scripts (e.g.,
V1.1__name.sql) – Executed only once - Repeatable scripts (e.g.,
R__name.sql) – Executed on each run only if the file content has changed. A hash of the content is stored in the history table to detect changes - Always scripts (e.g.,
A__name.sql) – Executed every time, regardless of changes
The order in which the scripts are applied is versioned first, then repeatable, and finally always. Lastly, it is imperative and stateless, so if you no longer need a database, you must explicitly remove it using a script.